I found this great Facebook page that really has me rethinking peanut butter and jelly sandwiches. Not that I am balking the old lunch stand by that has been around since, well, I’m assuming since the begging of time. I may just want a wee bit more nutrition for my wee ones. PB and J is fine for a fun snack or an item to put in their earthquake kits as I pretty sure peanut butter and unopened jelly may have an unlimited shelf life, however this fact is one I’d rather not ponder. I came across a great resource called.
WEELICIOUS

Weelicious.com or on Facebook Weelicious on Facebook
Weelicious is a website that gives families healthy fun food choices for kids. Every time I see one of their Facebook pics I have a desire to cut my food into fun geometric shapes and cram it into a little box. Like this…
So this little lunch box delight is banana and cream cheese sandwich,

vegetables and dip, dried mango slices and blood oranges. See are you feeling the pull of the creative weeliciousness?
Seriously I get burned out cooking the same meals for my family and this website gives us some great alternatives. Here is one of my favorites.
ITALIAN ASPARAGUS STICKS
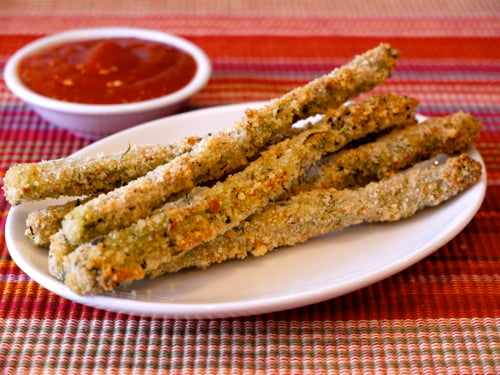
You will need these ingredients:
Italian Asparagus Sticks (Serves 4)
1 Cup Whole Wheat Panko or Bread Crumbs
1 Tbsp Italian Herbs (you can find them in any grocery’s spice section)
1/2 Tsp Salt
1/2 Tsp Garlic Powder
2 Large Eggs
1/4 Cup Flour
1 Bunch Asparagus, cleaned and stems removed (if you snap the asparagus down towards the bottom, they will naturally break at the woody part at the bottom)
1. Preheat oven to 450 degrees and coat a large baking sheet with cooking spray.
2. Mix the first 4 ingredients in a bowl.
3. Whisk the egg in a separate bowl.
4. Place the flour in another bowl.
5. Make an assembly line with the bowls. Dip the asparagus first into the flour, then the egg and finally into the bread crumb mixture, coating evenly and repeating with all the sticks.
6. Place all of the coated sticks on the baking sheet/rack. Arrange so they’re not touching, spray lightly with oil and bake for 30-35 minutes or until the bread crumbs are golden.
Looks really yummy huh. I can’t wait to try these.
Another cool site for fun and creative family foods is Disney’s Family Fun

This website has a lot of great ideas for families, including crafts, recipes and activities to do with the kids. I love being able to go to one place and have it all. Here is something from the site that caught me eye.
- DARK CHOCOLATE LAYER: 1 1/4 cups semisweet chocolate chips 1/2 cup sweetened condensed milk Dash of salt
 WHITE CHOCOLATE LAYER:
1 1/4 cups white chocolate chips
1/2 cup sweetened condensed milk
Dash of salt
OTHER INGREDIENTS AND MATERIALS:
Aluminum foil
64 conversation hearts
64 red foil bonbon cups or mini muffin cups
Clear or red cellophane wrap, cut into 64 5- by 6-inch rectangles
Sparkly pipe cleaners in red, pink, or silve
Line an 8-inch square pan with aluminum foil. Set aside.
In a medium-size, microwave-safe bowl, combine the dark chocolate layer ingredients. Microwave the mixture on high at 30-second intervals until the chocolate is melted (about a minute), stirring at each interval. When the mixture’s smooth, use a spatula to spread it evenly into the prepared pan.
In another medium-size microwave-safe bowl, combine the white chocolate layer ingredients. Repeat the melting process as described in step 2, but stir at 20-second intervals, as white chocolate tends to scorch easily. Spread the white chocolate evenly over the dark chocolate layer.
While the fudge is still warm, use a knife to gently score it into 1-inch squares, then put a candy heart on top of each square.
Chill the fudge uncovered in the refrigerator for at least 2 hours or until firm. Lift the foil to remove the fudge from the pan and place the whole hunk of fudge on a cutting board. Use a large knife (a parent’s job) to cut apart the squares, then peel off the foil from the bottom.
Place each fudge square into a foil bonbon cup or mini muffin cup. Center the cup on a cellophane square and wrap it as shown on page 53, using 1-inch pieces of pipe cleaner to secure the ends. Makes 64 bite-size pieces. Store at room temperature or in the refrigerator for added firmness.
Enjoy these fun recipes and make sure that you get the kids involved helping you make healthy and creative meals and snacks.
I will leave you with one last tid bit that I just had to share. Check out this funny commercial. It will make any mother’s heart just laugh.
VOLKSWAGON SPOT

